 how-to
How to Identify Moisture in Subfloors: A Step-by-Step Guide
Table of Contents
- Why Identifying Subfloor Moisture Matters Before Installing Hardwood Floors
- Visual Signs of Moisture Under Flooring
- How to Test Subfloor Moisture with a Moisture Meter
- Understanding Acceptable Subfloor Moisture Levels
- Distinguishing Moisture Sources: Leak, Groundwater, Condensation, or Residual Flood Damage
- How to Dry Out a Wet Subfloor
- When to Call a Professional for Subfloor Moisture Issues
- Frequently Asked Questions
Last Updated: October 8, 2026
Why Identifying Subfloor Moisture Matters Before Installing Hardwood Floors
Moisture in subfloors is one of the most common reasons hardwood flooring fails. When water sits beneath your floors, it causes cupping, warping, and adhesive failure. The wood swells unevenly. Gaps appear between planks. Mold can grow. By the time you notice the problem, replacing the floors becomes necessary.
Identifying moisture early prevents many issues. The good news: identifying moisture early prevents all of this. Testing takes a few hours and costs far less than replacing damaged hardwood.
This guide walks you through exactly how to identify moisture in subfloors before installation. We'll cover the visual signs to watch for, the testing methods that work, and what moisture readings actually mean. Whether you're dealing with wood or concrete subfloors, you'll learn the specific approach for each.
Visual Signs of Moisture Under Flooring
Before pulling out testing equipment, look for obvious signs of moisture damage. These visual clues tell you whether moisture is already a problem.
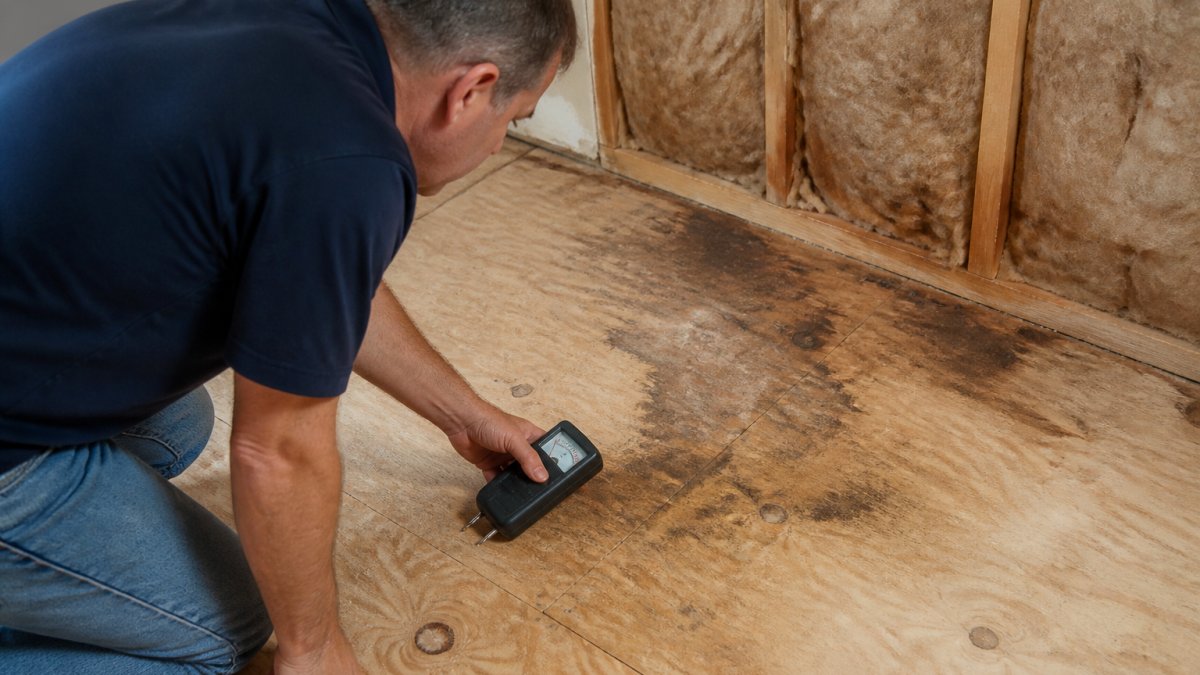
Dampness and discoloration are the first indicators. Walk your subfloor and feel for wet or clammy areas. Look for dark stains, water marks, or color changes in the wood.
Sweating or condensation on subfloor surfaces signals high humidity. If the surface feels slick or wet to the touch but there's no active leak, condensation is likely the cause.
Mold or mildew growth is a serious warning sign. Black, green, or white fuzzy patches indicate moisture has been present for weeks or months.
Warping, cupping, or gaps in existing flooring show past moisture damage. Cupping is when wood edges curl upward. Warping is twisting or bowing.
Soft spots or spongy areas mean the wood has started to rot. Press your finger into the subfloor.
How to Test Subfloor Moisture with a Moisture Meter
Testing is the only way to know if your subfloor is truly dry. Visual signs catch obvious problems, but hidden moisture requires measurement. A moisture meter gives you concrete numbers to work with.
What you'll need:
- A moisture meter (pin-probe or non-destructive)
- A reference baseline (a dry area you know is safe)
- A notebook to record readings
- Proper safety gear if mold or contamination is present
Start by identifying your test areas. Choose at least 3-5 spots across the subfloor. Include areas near walls, in the center, and anywhere you saw dampness or stains. Test the same spots multiple times to confirm consistency.
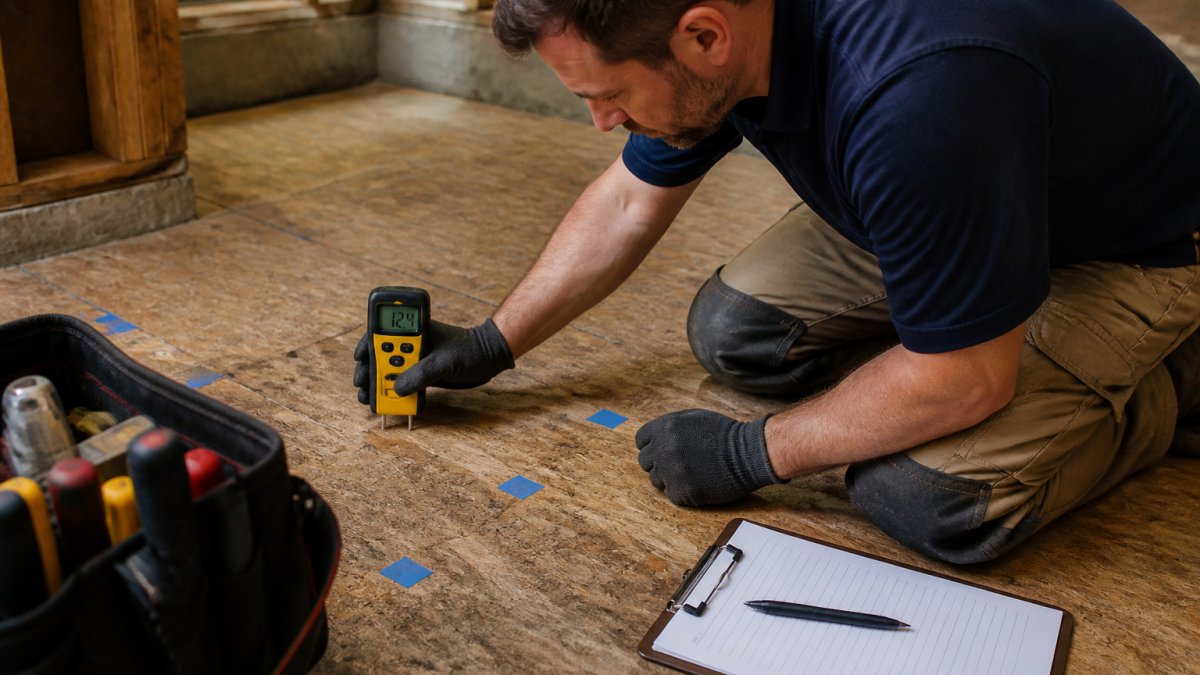
Record every reading. Write down the location, the meter reading, and the date. This creates a record you can reference later and share with flooring installers.
Testing Wood Subfloors with Pin-Probe and Non-Destructive Meters
Wood subfloors are tested differently depending on the meter type you use.
Pin-probe meters push two small pins into the wood surface. The pins measure electrical resistance, which correlates to moisture content. These meters are affordable and give fast results. The downside: they create small holes in the subfloor.
To use a pin-probe meter, press the pins firmly into the wood at a slight angle. Hold steady until the reading stabilizes (usually 5-10 seconds). Record the number. Most wood subfloors should read between 9-14% moisture content.
Non-destructive meters use electromagnetic waves instead of pins. They don't damage the subfloor. These meters cost more but are worth it if you want to avoid extra holes.
Test multiple depths if possible. Pin-probe meters can be pushed deeper to check moisture throughout the wood thickness. Moisture often concentrates near the bottom of the subfloor, so testing at different depths reveals whether water is still moving through.
Testing Concrete Subfloors with In-Situ Relative Humidity Testing
Concrete requires a different approach because it holds moisture differently than wood. The standard test is in-situ relative humidity (RH) testing, which measures how much moisture the concrete is releasing into the air above it.
This test follows ASTM F2170, the industry standard for concrete moisture testing (F2170 Standard Test Method for Determining Relative Humidity in Concrete Floor Slabs...). Here's how it works:
Step 1: Drill test holes into the concrete at least 40% of the slab's thickness deep. For a 4-inch slab, drill 1.5 inches deep. You'll need multiple holes across the subfloor (at least 3-5 locations).
Step 2: Insert humidity probes into each hole. These probes measure the relative humidity inside the concrete. Seal the hole around the probe with a cap to prevent outside air from affecting the reading.
Step 3: Wait 24 hours for the probes to stabilize. The reading needs time to settle.
Step 4: Record the RH percentage. Acceptable concrete moisture for hardwood installation is 75-85% relative humidity. Readings above 85% mean the concrete is too wet. The concrete needs more drying time.
In-situ RH testing is more accurate than surface meters for concrete because it measures moisture inside the slab, not just on top. This catches moisture that's still moving upward through the concrete.
Understanding Acceptable Subfloor Moisture Levels
Moisture readings only make sense when you know what numbers are safe. The acceptable range depends on your subfloor material and the flooring type you're installing.
For wood subfloors, hardwood flooring requires moisture content between 9-14%. This range keeps the wood stable. Readings above 16% are too wet. Readings below 8% are too dry and can cause shrinkage gaps.
For concrete subfloors, the standard is 75-85% relative humidity. This is the moisture the concrete is releasing into the air. Readings above 85% mean moisture is still moving up through the slab.
The difference between wood and concrete testing matters. Wood moisture content is measured as a percentage of the wood's weight.
Moisture gradients also matter. A moisture gradient is the difference between moisture levels at the top and bottom of the subfloor. If the bottom reads 18% and the top reads 12%, the subfloor is still drying.
Distinguishing Moisture Sources: Leak, Groundwater, Condensation, or Residual Flood Damage
Not all moisture is the same. Where the water came from changes how you fix it.
Active leaks come from plumbing, roof leaks, or window penetrations. Water is actively entering the subfloor. The wet area is usually localized and obvious. The fix: stop the leak first.
Groundwater intrusion happens when the water table is high or the foundation has cracks. Water seeps up through the concrete from below.
Condensation forms when warm air meets a cold subfloor surface. This is common in basements and crawlspaces. The subfloor feels damp, but there's no active water source.
Residual flood damage is moisture left behind after a flood or major water event. The water has receded, but the subfloor is saturated. The affected area can be very large.
Each source requires a different drying strategy. Identifying the source first saves time and prevents mistakes.
How to Dry Out a Wet Subfloor
Once you've identified moisture and its source, drying begins. The timeline depends on how wet the subfloor is and which drying method you use.
For minor moisture (readings just above acceptable):
- Run a dehumidifier in the space for 1-2 weeks
- Improve air circulation with fans
- Keep the area warm (above 65°F helps)
- Retest after one week to confirm improvement
For moderate moisture (significantly above acceptable):
- Use industrial-grade dehumidifiers and fans
- Run equipment continuously for 2-4 weeks
- Open windows if outdoor humidity is low
- Test every few days to track progress
- Consider renting drying equipment if you don't own it
For severe moisture (flooded or saturated subfloors):
- Hire a water damage restoration company
- They'll use professional-grade equipment and expertise
- Drying can take 4-8 weeks or longer
- Monitor for mold during the process
- Test multiple times before clearing for flooring installation
Vapor barriers help during drying. A plastic sheet laid over concrete prevents moisture from rising while the subfloor dries. This accelerates the process. Once the subfloor is dry, the barrier stays in place under the new flooring to prevent future moisture problems.
Never rush the drying process. Installing flooring over wet subfloors guarantees failure. The wood will cup and warp. Adhesive will fail. You'll be replacing the floors within a year. Patience now saves thousands in repairs later.
When to Call a Professional for Subfloor Moisture Issues
Some moisture problems are beyond DIY testing and drying. Knowing when to call a professional saves time and prevents costly mistakes.
Call a moisture specialist if:
- You find mold on the subfloor
- Moisture readings are consistently high across large areas
- You suspect groundwater intrusion or a structural leak
- The subfloor shows signs of rot or structural damage
- You've tried drying for several weeks with no improvement
- You're uncertain about the moisture source
Call Freddie Sanchez Hardwood Floors if:
- You're ready to install hardwood flooring after drying is complete
- You need expert assessment of whether the subfloor is ready for installation
- You want professional guidance on moisture prevention strategies
- You're planning a flooring project and want to avoid moisture problems before they start
We can inspect your subfloor, review your moisture test results, and recommend the best approach for your specific situation. Our team coordinates with moisture specialists when needed and ensures your new hardwood floors are installed on a properly prepared, dry subfloor.
A professional assessment costs far less than replacing failed flooring. It gives you confidence that your investment is protected.
Frequently Asked Questions
What is an acceptable moisture reading in a subfloor?
Acceptable moisture levels depend on the subfloor material. For wood subfloors, moisture content should typically be between 9-14%, with readings above 16% indicating potential problems. For concrete subfloors, in-situ relative humidity should be below 75-85% (standards vary by flooring type). Always consult ASTM F2170 guidelines for concrete testing. Readings outside these ranges suggest moisture issues that must be resolved before installing hardwood flooring, as excess moisture causes cupping, warping, and adhesive failure.
How can you tell if there is moisture under the floor?
Visible signs include dampness, sweating on the subfloor surface, mold growth, discoloration, or musty odors. Use a moisture meter to confirm, pin-probe meters work for wood, while in-situ relative humidity testing works for concrete. Check multiple test areas across the subfloor. If readings are elevated or you notice efflorescence (white powdery deposits on concrete), moisture is present. Inspect the foundation for cracks, poor drainage, or standing water outside the building that could indicate groundwater intrusion.
What tools can you use to test a subfloor for moisture?
A moisture meter is the primary tool. Pin-probe (pin-type) meters measure wood moisture content directly by piercing the surface. Non-destructive meters work on wood without damage. For concrete, use an in-situ relative humidity meter following ASTM F2170 standards, which involves sealed test cups. A moisture meter should be properly calibrated before use. Visual inspection for mold, dampness, and efflorescence is also essential. Some professionals use thermal imaging to detect temperature differences indicating moisture areas.
Can moisture in a subfloor damage hardwood flooring?
Yes, subfloor moisture is one of the leading causes of hardwood flooring failure. Excess moisture causes wood to absorb water, leading to cupping (edges higher than center), warping, and gaps between boards. It also weakens adhesives, causing flooring to separate or fail. Mold and mildew can develop, creating health hazards and unpleasant odors. Installing hardwood over a wet or damp subfloor virtually guarantees these problems within months. Always test and dry the subfloor to acceptable moisture levels before installation to ensure long-term durability and appearance.
Moisture in subfloors is preventable. Testing identifies problems early. Drying solves them before flooring installation. When you're ready to move forward with hardwood flooring, Freddie Sanchez Hardwood Floors brings expert craftsmanship and careful attention to every detail. We ensure your subfloor is properly prepared and your new floors are installed to last. Get a Free Quote today and let's protect your investment from the ground up.